Thursday, 12 May 2016

Trusting cloud??

Don’t Trust the Cloud Alone: Think 3-2-1


3-2-1 Backup
It may sound contradictory coming from someone whose livelihood is based on the cloud, but I think trusting the cloud alone with the information that’s important to you can be a mistake. You can avoid it with the 3-2-1 Backup Strategy. Let me explain.
I love music. I bought a lot of audio CDs back in the day. I ripped digital copies I was happy with and put the originals away in boxes in the basement, where they remain. iTunes, eMusic, Bandcamp, and a succession of other music download services have helped me grow the collection over the years.
As the collection grew, dealing with its sheer size has presented some interesting challenges when figuring out how to listen to it on devices with varying amounts of storage, like my computer, phone, and tablet. That’s one reason Apple’s iTunes Match service appealed to me as soon as it was introduced. My music library would be available to all my devices in the cloud, with my main computer as the home for all my content.
iTunes Match scanned my hard drive, matched copies of everything that was already in iTunes, including stuff I’d bought on CD or through other music download services, and then uploaded the remaining stuff that didn’t match.
I could browse my catalog and listen to whatever I wanted to, from whichever device I wanted to. Even if it meant I didn’t have my entire library on each device, all that stuff was in the cloud. All those music files also lived on my main computer, though, which was the de facto digital hub for any of my other devices.
That worked great until I started to run out of drive space. I didn’t have an external drive handy besides the one I was using for occasional backups, so I began thinking of another way to free up space. That’s when it dawned on me that I could leave my music in the cloud without actually keeping it on my hard drive.
“Delete it all locally,” I figured. “Just leave the files in the cloud. I can redownload whatever I need when I need it.”
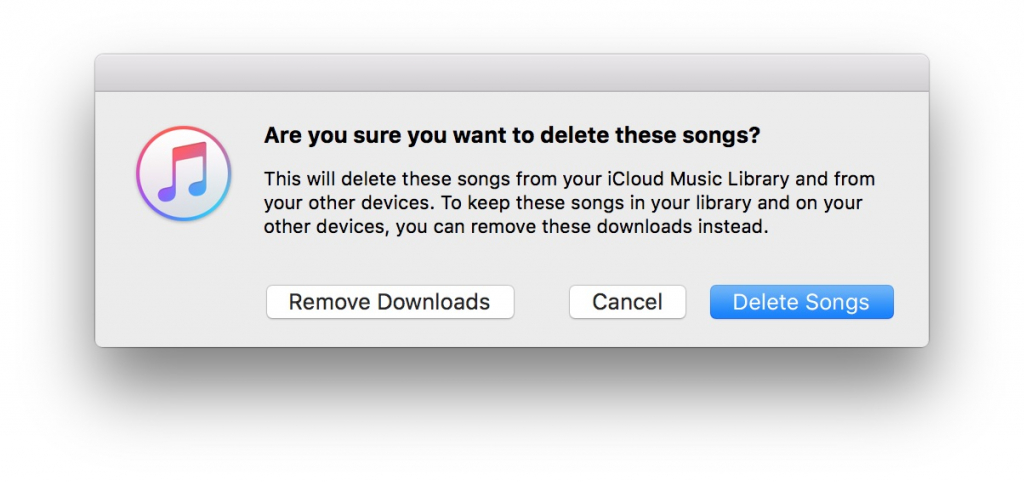
So I started pruning my local music library. It worked, too. Worked like a charm. I just had to be careful, because iTunes lets you remove the downloads to save space, or delete them – striking them from your collection forever.
delete
Now, that’s not a difficult message to parse. Do one thing, you remove your music but you still keep it. Do the other, and delete it all together. I’d eventually screw that up. I ended up deleting every single song from every artist whose name began with A through M.
Of course, Murphy’s Law raised its ugly head: Anything that could go wrong, went wrong. That’s when I discovered my local backup drive wasn’t working. I couldn’t restore the files. I hadn’t tested my backup lately and now was paying the price.
Eventually I was able to rebuild most of what I’d lost, but it was only through sheer luck. And even to this day I regularly look for music in my collection which I know I have, and can’t find. Those audio CDs are still in boxes in the basement, but digging them out and re-ripping them is a manual, burdensome process.
This is why the 3-2-1 Backup Strategy is something we’ve focused on a lot over the years at Backblaze, and will continue to talk about. I had one backup, which I thought was enough. It wasn’t. Having those files in one more place would have saved me a lot of heartache.
How does your backup scheme work? Are you confused about the 3-2-1 strategy or do you have any other questions? Let me know.

Storage pod

Storage Pod 5.0 Hack: One Power Supply


Backblaze Storage Pod
In November we introduced and open sourced the design to Storage Pod 5.0. Extensively redesigned using our Agile hardware design process, Storage Pod 5.0 was the least expensive storage solution we’ve ever designed, until now. With one simple hack, you can now have 180TB of storage for about a $0.05 a gigabyte if you build it yourself, here’s how.
The Storage Pod 5.0 Hack
The hack is to reduce the number of power supplies used in a Storage Pod from two to one. As with most hacks there are a few of tricks that make this work:
  1. We used the same Power Supply (EVGA Supernova NEX750G1) so we didn’t need to order and stock a different model.
  2. We designed and built a single Pigtail Cable to go from the PSU (power supply unit) to both of the Cable Harnesses (20-pin and 24-pin). This new cable replaces the two Pigtail Cables that went to the 24-pin and 20-pin Cable Harnesses. Here are the specifications for the new single Pigtail Cable.
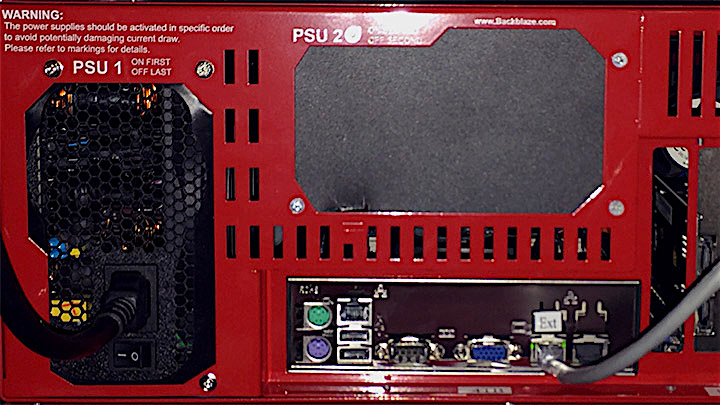
  3. We designed a new cover plate to cover the hole left in the chassis by not using the second PSU. You don’t need to do this, and as you can see from the image above we did not, but in case you want to here are the specifications for the cover plate.
  4. We used Seagate 4TB hard drives (model:ST4000DM000) in the Storage Pods.
Put all this together and we save about $150 on each Storage Pod we make. Savings come from the cost of the 2nd PSU and one less cable offset by the cost of the cover plate. The cost of the hard drives has also decreased, but we won’t take credit for that…
Digging into the Hack
Since Storage Pod 1.0 we have used two Power Supplies to provide the 5V and 12V power needed for the data drives, boot drive, motherboard/CPU, and backplanes. We divided the load between the two power supplies with the power required by the 45 data drives being the primary reason we used two power supplies. The second PSU did not provide redundancy.
We used two smaller PSUs instead of one large one as it gave us more “headroom” in case the power requirements increased over time. Over the years this has proven to be the right choice as power requirements have generally increased as drive sizes have increased. The chart below shows the relationship of drive size to power requirements for the Seagate Desktop Hard Drives we have used over the past several years.
Seagate HDD Power Consumption
  1.5TB2TB3TB4TB6TB
Idle
 Watts3.44.55.44.07.2
 5V Amps0.1520.1960.1900.1090.190
 12V Amps0.2160.2960.3770.2890.520
Operating
 Watts5.96.78.05.68.8
 5V Amps0.5000.5250.5100.3190.230
 12V Amps0.3290.3400.4620.3290.540
The only outlier is the Seagate 4TB drive, more on that in a minute.
Even with the increasing power demands we were able to use the same PSU in the 1.0, 2.0, 3.0, and 4.5 Storage Pod versions. We did change PSU models in Storage Pod 5.0, but the previous PSU should still work in the new environment.
Testing the viability of a single PSU has been on our to-do list for a while as a means to decrease cost. With Backblaze Labs coming online, we were able to try this out. We started our testing with a drive we currently use, the Seagate 4TB drive (Model: ST4000DM000). We have nearly 30,000 of these drives in production and they have proven to be reliable with a respectable 3.06% annual failure rate in our environment.
The choice of this Seagate 4TB drive proved to be fortuitous:
  1. The Seagate drive takes up to 18 seconds, by specification, to spin up from power on to a ready state. That length of time spreads out the load on the PSU to power up 45 hard drives in a Storage Pod. A single drive requires up to 2 Amps to power up, a total of 90 Amps if all 45 of the drives needed 2 Amps of power at the same time. The single PSU maxes out (100% load) at 56.45 Amps, on the 12V rail, so spreading out the demand allows everything to power up without incident.
  2. Once a Storage Pod is powered up, it stays on. On average, a Storage Pod is turned off/on 1-2 times a year. Even though the power demand during the boot up process is a bit taxing on the PSU, it happens very infrequently.
  3. The design of our overall data storage system spreads out the operational load on any given Storage Pod. This means that at any given time a “majority” of drives in a Storage Pod are idle. The lower power requirements of the Seagate 4TB drive during idle and operation means the total power draw from the 45 hard drives in a Storage Pod does not exceed the specifications of the single PSU on the 5V or the 12V rails.
Why This Matters to Backblaze
Eliminating the need for a second PSU saves about $150 per Pod. Is that worth the effort? What if we were to remove one PSU from each Storage Pod using the 4TB Seagate drives? That’s about 660 Storage Pods. If it costs us $50 in labor to remove the second PSU, we’d still “profit” by $100 per Pod or $66,000 in total and have Power supplies for the next 660 Storage Pods.
Admittedly it’s not that simple, for example, what if we wanted to go to 6TB drives? They require more power so the current single PSU probably would not work, thereby limiting our savings. Still, having this one-PSU hack available allows us to save a few dollars today and over time all these little things add up.
Tweaks
Trying other hard drives – The Seagate 4TB drive makes this hack work as it uses less power than the other drives we tried. For example, we bench-tested 500GB drives using a single PSU at our Storage Pod assembly facility. They failed – the Storage Pod would not boot-up. We are currently trying other drive models and we’ll let you know if we find any others that work.
Trying other PSUs – As noted earlier, this hack used the same PSU as in Storage Pod 5.0. While we strive to keep the number of part models to a minimum, to help keep costs down, Backblaze Labs is in the process of trying out other PSU units to see if they will work. We’ll let you know what we find.
If you plan on enhancing the operational capabilities of your Storage Pod, for example adding 7200 or 15000 rpm drives or beefing up the motherboard and CPU, pay attention to the power you’ll need. You don’t want to max out at 30 drives because you saved a few dollars on a PSU.
Building Your Own One PSU Storage Pod 5.0
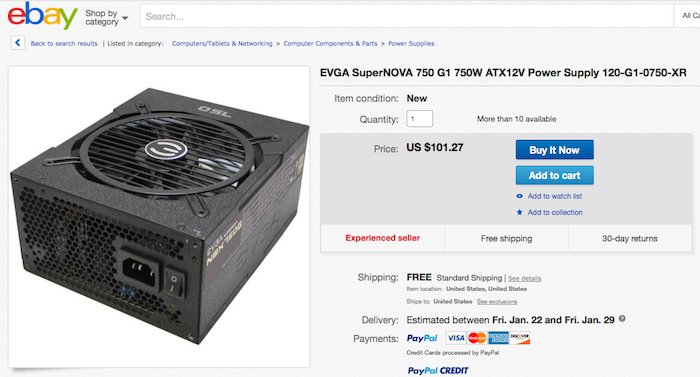
To get started with building your own single PSU Storage Pod, you can checkout theStorage Pod 5.0 blog post to get a parts list, build instructions, etc. You should also visitwww.backuppods.com. They will sell you nearly everything you need from just a Storage Pod chassis, to do-it-yourself kits, to fully assembled Storage Pods (without hard drives.) For example, you could purchase the “Classic” kit, sell the extra PSU on eBay, build your own Pigtail cable, install 45 hard drives, and you’re on your way for about $9,000 or about 0.05 per Gigabyte not including tax, shipping, and of course your time. And it looks like you can get about $100 for the extra PSU.
blog-psu-ebay
More Storage Pod Hacks?
Over the years many of you have taken our Storage Pod designs and added your own special “hacks.” If you have a hack or two you’d like to share just let us know in the comments below or tweet us @backblaze. If we get enough of them, we’ll select a handful of your enhancements and publish them in an upcoming blog post. Thanks.

Backblaze

Backblaze B2 – Big File Beta


B2 Cloud Storage Beta II
With the 20,000+ people that have signed up for B2, we have received a lot of feedback, and have been working diligently to incorporate it. If you like big files…really big files, you’ll really like this release – the B2 Big File Beta – but there’s a lot more to like. Let’s take a look.
B2 Large File Features
  • Large Files
    While B2 supports storing an unlimited amount of data, previously, the largest individual file that could be uploaded was 5GB. Now B2 supports individual files up to 10TB – an increase of 20,000%. This is also 2x the size of Amazon S3 or Google Cloud Platform’s largest supported file size, and 10x that of Azure’s. You can get more details on how the leading cloud storage providers compare here.
  • Snapshots
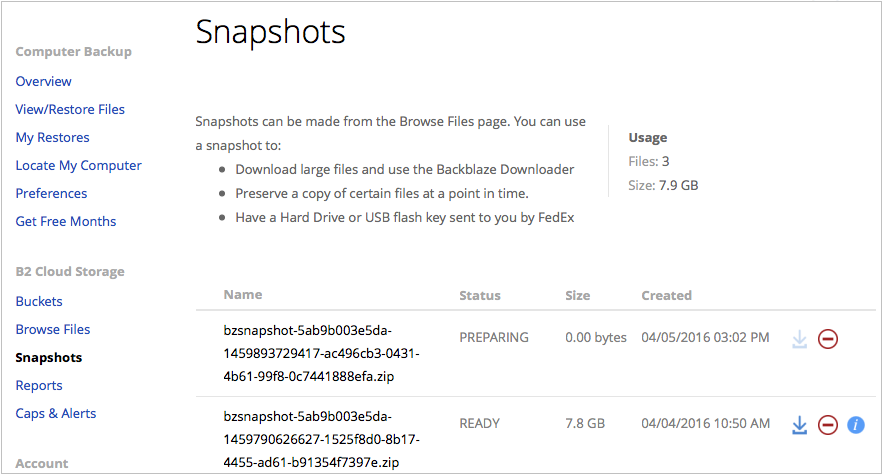
    Users can select any number of files stored in B2 to combine into a “Snapshot”. Snapshots can be up to 10TB in size. Snapshots are ideal for capturing a moment in time for files, keeping multiple archives of data, and more.
B2 Snapshot
  • Working With Large Files and Snapshots
    Large files and Snapshots can be downloaded via the B2 Web UI, the B2 CLI tool, or the B2 API. Additionally, Cyberduck supports drag-and-drop downloading of large files and Snapshots.
Additional Enhancements
  • S3-to-B2 Migrator
    Enables automatic duplication of S3 data into B2. Ideal for making a backup or archive of S3 data for redundancy or moving from S3 for cost savings. Can be used to move petabytes of data quickly. Please contact our B2 Sales Team for more information.
  • Large File API
    B2 has added a set of Large File APIs for developers to break large files into multiple pieces and upload the parts in parallel. This allows developers to monitor and manage the entire process of uploading large files. Once uploaded, large files can be downloaded/deleted/listed/hidden just like any other file.
  • Metadata in List Files API
    Previously, determining certain metadata about a file such as uploadTimestamp or SHA1 required requesting it for each file. This metadata has been added to the List Files API enabling developers to quickly get info for all files.
  • B2 CLI
    The B2 Command-Line Tool has numerous enhancements including the ability to upload and download large files, download Snapshots, install via pip, and more.
  • Caps and Alerts
    In addition to be able to set caps on spending, users can now be alerted via text message and/or email about cap status.
  • Integration Checklist
    Backblaze has published an Integration Checklist for offerings to self-certify based on recommended guidelines. This provides the developer community best practices for integration development and helps promote the resulting integrations to the B2 user community.
Integrations
While Backblaze was working on improving B2, developers were creating and publishing integrations making B2 Cloud Storage even easier to use. Check out the B2 Integrationspage for solutions from CyberDuck, odrive, Cubix and more. All of these have successfully passed our self-certification process noted earlier and more integrations are on the way.
Try B2 Cloud Storage today
If you are a developer, start from the B2 Docs page, and simply click on any B2 API call. Then scroll to the bottom of the page to see the coding examples in Java, Python, Ruby, C# and more. IT folks will find the Command-Line Tool handy for scripting tasks requiring data to be stored off-site. And, if you’re not technical, you can still use the B2 Web GUI or installCyberduck, an app for your Mac or PC, to drag-and-drop files into B2. In short, no matter who you are, if you have data to store in the cloud, B2 can help.

Datacentre

A Day in the Life of a Datacenter, Part I


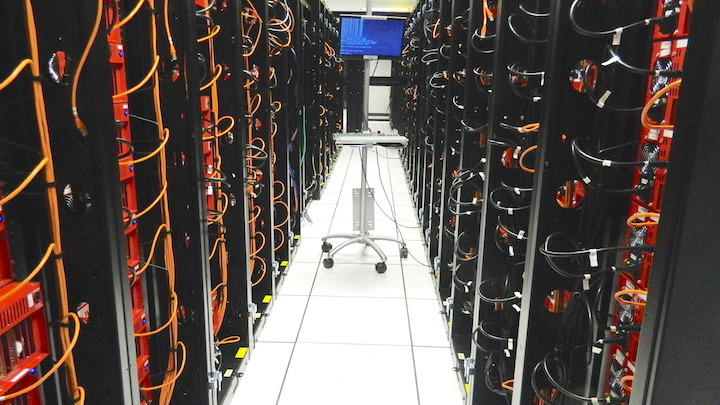
A datacenter is part of the “cloud”; as in cloud backup, cloud storage, cloud computing, and so on. It is often where your data goes, or goes through, once it leaves your home, office, mobile phone, tablet, etc. While many of you have never been inside a datacenter, chances are you’ve seen one. Cleverly disguised to fit in, datacenters are often plain buildings with few if any windows and little if any signage. Datacenters can be easy to miss. There are exceptions of course, but most datacenters are happy to go completely unnoticed.
We’re going to take a look at a typical day in the life of a datacenter. We’ll start off with this post being about the environment – what it’s like inside. In later posts we’ll take you through some of the activities inside, from changing out hard drives, to racking Storage Pods, to diagnosing problems and more. Let’s get started.

Getting inside a datacenter

As one approaches a datacenter you’ll notice there isn’t much to notice. There’s no “here’s my datacenter” signage and the parking lot is nearly empty. You might wonder, “is this the right place?” While larger, more prominent, datacenters will have armed guards and gates, most datacenters have a call-box outside of a locked door. In either case, datacenters don’t like drop in visitors, so unless you’ve already made prior arrangements you’re going to be turned away. In short, regardless of whether it is a call-box or an armed guard, a primary line of defense is to know everyone whom you let in the door.
Once inside the building you’re still a long way from being in the actual datacenter. You’ll start by presenting the proper identification to the guard and fill out some paperwork. Depending on the facility and your level of access, you will have to provide a fingerprint that will be used for biometric access/exit confirmation. Eventually you’ll be given a badge or other form of visual identification that shows your level of access. For example, you could have free roam of the place (highly doubtful), or be allowed in certain defined areas (doubtful), or have to be escorted wherever you go (likely). For this post, we’ll give you access to the Backblaze areas in the datacenter, escorted of course.
We’re ready to go inside, so clip on your badge with your picture on it, get your finger ready to be scanned, and remember to smile for the cameras as you pass through the “box.” While not the only method, the “box” is a widely used security technique that allows one person at a time to pass through a room where they are video-taped and visually approved before they can leave the room. Speaking of being on camera, by this point you will have passed dozens of cameras – hidden, visible, behind one-way glass etc. – since you first stepped foot on the property.
Once past the “box” you’re in the datacenter, right? Probably not. Datacenters can be divided into areas or blocks each with different access codes and doors. Once out of the box, you still might only be able to access the snack room and the bathrooms. These “rooms” are always located outside of the actual datacenter floor. Let’s step inside the datacenter floor, “badge in please.”
Inside the datacenter
While every datacenter is different, there are three things that most people find common in their experience; how clean it is, the noise level and the temperature.
Datacenters are clean
From the moment you walk into a typical datacenter you’ll notice that it is clean. While most datacenters are not cleanrooms by definition, they do ensure the environment is suitable for the equipment housed there.
Datacenter Entry Mats
Cleanliness starts at the door where mats like the one above capture the dirt from the bottom of your shoes. These mats are replaced regularly. As you look around, you might notice that there are no trashcans on the datacenter floor. As a consequence the datacenter staff follows the “whatever you bring in, you bring out” philosophy. In addition, most datacenters won’t allow food or drink on the datacenter floor. Instead, you badge out of the datacenter floor to have a snack or use the restroom.
Besides being visually clean, the air in a datacenter is also amazingly clean as it is highly filtered to the sub-micron level. The filters used are typically rated with a 99.97% (or higher) efficiency in removing 0.3 micron particles. In comparison, your typical home filter provides a 70% sub-micron efficiency level. That might explain the dust bunnies behind your gaming tower.
Datacenters are Noisy
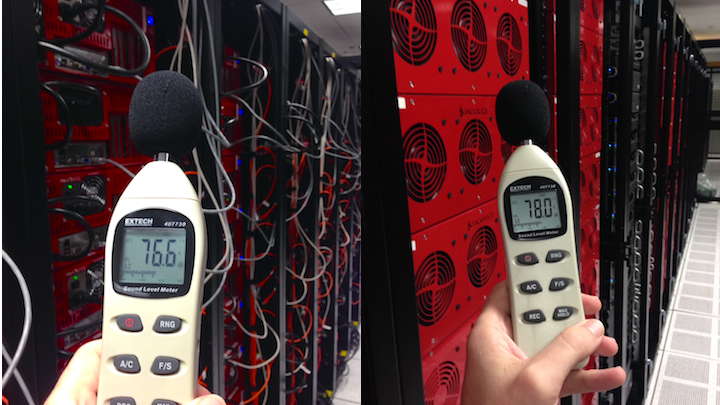
Datacenter Noise Levels
The decibel level in a given datacenter can vary greatly. As you can see above the Backblaze datacenter is between 76 and 78 decibels. This is the level when you are near the racks of Storage Pods. How loud is 78dB? Normal conversation is 60dB, a barking dog is 70dB, and a screaming child is only 80dB. In the US, OSHA has established 85dB as the lower threshold for potential noise damage. Still, 78dB is kind of loud so we insist that our datacenter staff wear ear protection on the datacenter floor. Their favorite earphones are the noise reduction type by Bose, they are a bit costly, but well worth it.
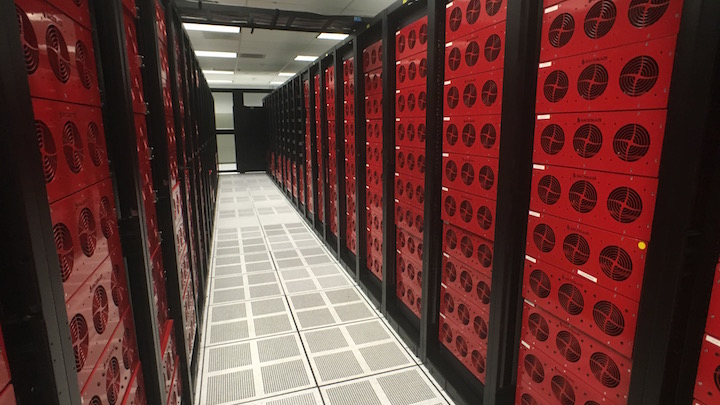
The noise comes from a combination of the systems needed to operate the datacenter; air filtration, heating and air conditioning, electric, etc. combined the sound of about 6,000 spinning 3-inch fans in the Storage Pods.
Datacenters are hot, datacenters are cold
As noted, part of the noise comes from heating and air-conditioning systems, mostly air-conditioning. As you walk through the racks and racks of equipment in many datacenters, you’ll alternate between warm aisles and cold aisles. In a typical raised floor datacenter, cold air rises from vents in the floor in front of each rack. Fans inside the servers in the racks, in our case Storage Pods, pull the air in from the cold aisle and through the server. By the time the air reaches the other side, the warm aisle, it is warmer and is sucked away by vents in the ceiling or above the racks.
There was a time when datacenters were like meat lockers with some kept as cold as 55°F (12.8°C). Warmer heads prevailed and over the years the average temperature has risen to over 80°F (26.7°C) with some companies pushing that even higher. That works for us, but in our case we are more interested in the temperature inside our Storage Pods and more precisely the hard drives within. Previously we looked at the correlation between hard drive temperature and failure rate. The conclusion: As long as you run drives well within their allowed range of operating temperatures, there is no problem operating a datacenter at 80°F (26.7°C) or even higher. As for the employees, if they get hot they can always work in the cold aisle for a while and vice-versa.
Getting out of a datacenter
When your datacenter visit is done, remember to leave yourself a few extra minutes to get out. The first challenge is to find your way back to the entrance. If you are escorted, there’s no issue, but if you’re on your own I hope you paid attention on the way in. It’s amazing how all the walls and doors look alike as you’re wandering around looking for the exit, and with datacenters getting larger and larger the task won’t get any easier. For example, when completed in 2016, the Switch SUPERNAP datacenter complex in Reno Nevada will be over 6.4 million square feet, roughly the size of the Pentagon. Having worked in the Pentagon, I can say that finding your way around a facility that large can be daunting. Of course, a friendly security guard is likely to show up to help if you get lost or curious.
On your way back out you’ll pass through the “box” once again for your exit cameo. Also, if you are trying to leave with more than you came in with you will need a fair bit of paperwork before you can turn in your credentials and exit the building. Don’t forget to wave at the cameras in the parking lot.
Join us on our next datacenter visit as we follow around our datacenter techs to see what a day in datacenter is like for them

Storage

Storage Pod 6.0: Building a 60 Drive 480TB Storage Server


Storage Pod 6.0
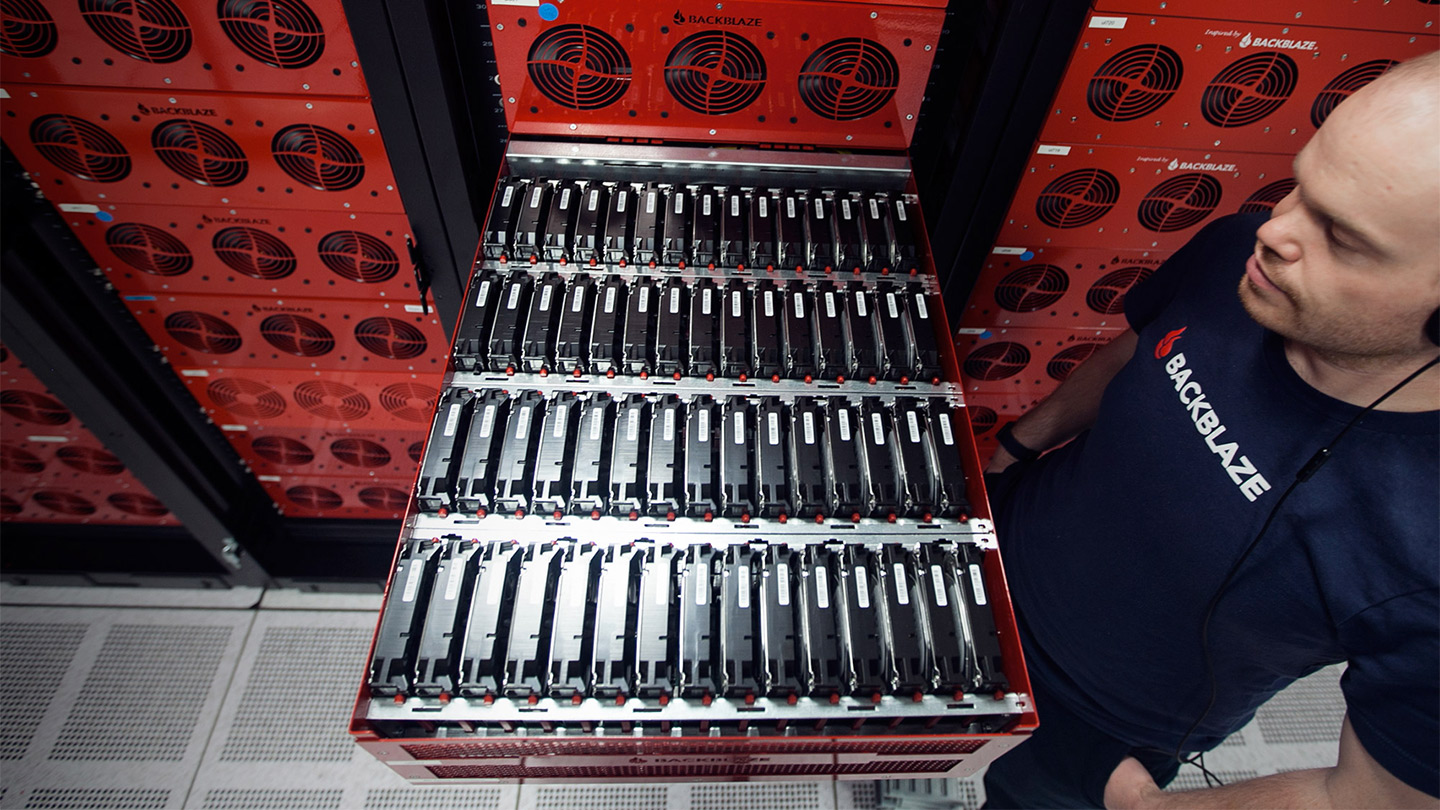
Storage Pod 6.0 deploys 60 off-the-shelf hard drives in a 4U chassis to lower the cost of our latest data storage server to just $0.036/GB. That’s 22 percent less than our Storage Pod 5.0 storage server that used 45 drives to store data for $0.044/GB. The Storage Pod 6.0 hardware design is, as always, open source so we’ve included the blueprints, STEP files, wiring diagrams, build instructions and a parts list so you can build your very own Storage Pod. Your cost may be a bit more, but it is possible for you to build a 4U server with 480TB of data storage for less than a nickel ($0.05) a gigabyte – read on.
A little Storage Pod history
In 2009, Storage Pod 1.0 changed the landscape in data storage servers by delivering 67.5TB of storage in a 4U box for just $0.11/GB – that was up to 10 times lower than comparable systems on the market at the time. We also open-sourced the hardware design of Storage Pod 1.0 and companies, universities, and even weekend hobbyist started building their own Storage Pods.
Over the years we introduced updates to the Storage Pod design, driving down the cost while improving the reliability and durability with each iteration. Storage Pod 5.0 marked our initial use of the Agile manufacturing and design methodology which helped identify and squeeze out more costs, driving our cost per GB of storage below $0.05. Agile also enabled us to manage a rapid design prototyping process that allowed us stretch the Storage Pod chassis to include 60 drives then produce 2-D and 3-D specifications, a build book, a bill of materials and update our manufacturing and assembly processes for the new design – Storage Pod 6.0. All of this in about 6 months.

What’s new in Storage Pod 6.0

60 drive storage server
What’s new is 60 drives in a 4U chassis. That’s a 33 percent increase to the storage density in the same rack space. Using 4TB drives in a 60-drive Storage Pod increases the amount of storage in a standard 40U rack from 1.8 to 2.4 Petabytes. Of course, by using 8TB drives you’d get a 480TB data storage server in 4U server and 4.8 Petabytes in a standard rack.
When looking at what’s new in Storage Pod 6.0 it would easy to say it has 60 drives and stop there. After all, the Motherboard, CPU, memory, SATA cards, and backplanes we use didn’t change from 5.0. But expanding to 60 drives created all kinds of things to consider, for example:
  • How long do you make the chassis before it is too long for the rack?
  • Will we need more cooling?
  • Will the power supplies need to be upgraded?
  • Will the SATA cables be too long? The maximum spec’d length is 1 meter.
  • Can the SATA cards keep up with the 15 more drives? Or will we need to upgrade them?
  • Will the CPU and the motherboard be able to handle the additional data load of 15 more drives?
  • Will more or faster memory be required?
  • Will the overall Storage Pod be correctly balanced between CPU, memory, storage and other components so that nothing is over/under-spec’ed?
  • What hard drives will work with this configuration? Would we have to use enterprise drives? Just kidding!
Rapidly iterating to the right design
As part of the prototyping effort we built multiple configurations and Backblaze Labs put each configuration through its paces. To do this we assembled a Backblaze Vault with 20 prototype Storage Pods in three different configurations. Since each Storage Pod in a Backblaze Vault is expected to perform similarly, we monitored and detected those Storage Pods that were lagging as well as those that were “bored”. By doing this were were able to determine that most of the components in Storage Pod 6.0 did not need to be upgraded to achieve optimal performanace in Backblaze Vaults utilizing 60 drive Storage Pods.
We did make some changes to Storage Pod 6.0 however:
  • Increased the chassis by 5 ½” from 28 1/16” to 33 9/16” in length. Server racks are typically 29” in depth, more on that later.
  • Increased the length of the backplane tray to support 12 backplanes.
  • Added 1 additional drive bracket to handle another row of 15 drives.
  • Added 3 more backplanes and 1 more SATA card.
  • Added 3 more SATA cables.
  • Changed the routing to of the SATA-3 cables to stay within the 1-meter length spec.
  • Updated the pigtail cable design so we could power the three additional backplanes.
  • Changed the routing of the power cables on the backplane tray.
  • Changed the on/off switch retiring the ele-302 and replacing it with the Chill-22.
  • Increased the length of the lid over the drive bay 22 7/8”.
That last item, increasing the length of the drive bay lid, led to a redesign of both lids. Why?
Lids and Tabs
The lid from Storage Pod 5.0 (on the left above) proved to be difficult to remove when it was stretched another 4+ inches. The tabs didn’t provide enough leverage to easily open the longer drive lid. As a consequence Storage Pod 6.0 has a new design (shown on the right above) which provides much better leverage. The design in the middle was one of the prototype designs we tried, but in the end the “flame” kept catching the fingers of the ops folks when they opened or closed the lid.
Too long for the server rack?
The 6.0 chassis is 33 9/16” in length and 35 1/16” with the lids on. A rack is typically 29” in depth, leaving 4+ inches of Storage Pod chassis “hanging out.” We decided to keep the front (Backblaze logo side) aligned to the front of the rack and let the excess hang off the back in the warm aisle of the datacenter. A majority of a pod’s weight is in the front (60 drives!) so the rails support this weight. The overhang is on the back side of the rack, but there’s plenty of room between the rows of racks, so there’s no issue with space. We’re pointing out the overhang so if you end up building your own Storage Pod 6.0 server, you’ll leave enough space behind, or in front, of your rack for the overhang.
The cost in dollars
There are actually three different prices for a Storage Pod. Below are the costs of each of these scenarios to build a 180TB Storage Pod 6.0 storage server with 4TB hard drives:
How BuiltTotal CostDescription
Backblaze$8,733.73The cost for Backblaze given that we purchase 500+ Storage Pods and 20,000+ hard drives per year. This includes materials, assembly, and testing.
You Build It$10,398.57The cost for you to build one Storage Pod 6.0 server by buying the parts and assembling it yourself.
You Buy It$12,849.40The cost for you to purchase one already assembled Storage Pod 6.0 server from a third-party supplier and then purchase and install 4TB hard drives yourself.
These prices do not include packaging, shipping, taxes, VAT, etc.
Since we increased the number of drives from 45 to 60, comparing the total cost of Storage Pod 6.0 to previous the 45-drive versions isn’t appropriate. Instead we can compare them using the “Cost per GB” of storage.
The Cost per GB of storage
Using the Backblaze cost for comparison, below is the Cost per GB of building the different Storage Pod versions.
Storage Pod versions
As you can see in the table, the cost in actual dollars increased by $760 with Storage Pod 6.0, but the Cost per GB decreased nearly a penny ($0.008) given the increased number of drives and some chassis design optimizations.
Saving $0.008 per GB may not seem very innovative, but think about what happens when that trivial amount is multiplied across the hundreds of Petabytes of data our B2 Cloud Storage service will store over the coming months and years. A little innovation goes a long way.

Building your own Storage Pod 6.0 server

Chassis – We’ve provided all the drawings you should need to build (or to have built) your own chassis. We’ve had multiple metal bending shops use these files to make a Storage Pod chassis. You get to pick the color2-D Blueprints – ZIP file: 4.6 MB
  • 3-D Solidworks files – ZIP file: 112.0 MB
  • STEP files – ZIP file: 26.6 MB
  • Drive Guide design files – ZIP file: 606 KB
Parts – In Appendix A we’ve listed all the parts you’ll need for a Storage Pod. Most of the parts can be purchased online via Amazon, Newegg, etc. As noted on the parts list, some parts are purchased either through a distributor or from the contract assemblers.
  • Storage Pod 6.0 Parts List – PDF file: 49 KB
Wiring – You can purchase the power wiring harness and pigtails as noted on the parts list, but you can also build your own. Whether you build or buy, you’ll want to download the instructions on how to route the cables in the backplane tray.
  • Wiring Diagrams – ZIP file: 537 KB
  • Wiring Routes – ZIP file: 37.0 KB
Build Book – Once you’ve gathered all the parts, you’ll need the Build Book for step-by-step assembly instructions.
  • Build Book – PDF file: 20.8MB
As a reminder, Backblaze does not sell Storage Pods, and the design is open source, so we don’t provide support or warranty for people who choose to build their own Storage Pod. That said, if you do build your own, we’d like to hear from you.
Building a 480TB Storage Pod for less than a $0.05 per GB
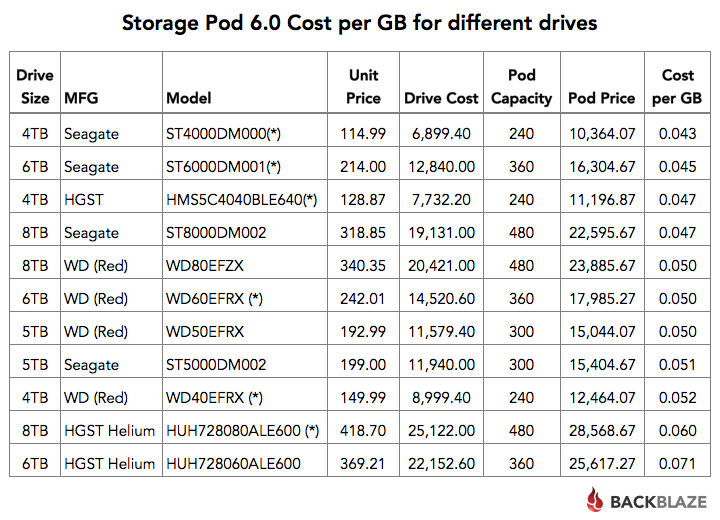
We’ve used 4TB drives in this post for consistency, but we have in fact built Storage Pods with 5-, 6- and even 8-TB drives. If you are building a Storage Pod 6.0 storage server, you can certainly use higher capacity drives. To make it easy, the chart below is your estimated cost if you were to build your own Storage Pod using the drives noted. We used the lowest “Street Price” from Amazon or Newegg for the price of the 60 hard drives. The list is sorted by the Cost per GB (lowest to highest). The (*) indicates we use this drive model in our datacenter.
Storage Pod Cost per GB
As you can see there are multiple drive models and capacities you can use to achieve a Cost per GB of $0.05 or less. Of course we aren’t counting your sweat-equity in building a Storage Pod, nor do we include the software you are planning to run. If you are looking for capacity, think about using the Seagate 8TB drives to get nearly a half a petabyte of storage in a 4U footprint (albeit with a 4” overhang) for just $0.047 a GB. Total cost: $22,600.
What about SMR drives?
Depending on your particular needs, you might consider using SMR hard drives. An SMR drive stores data more densely on each disk platter surface by “overlapping” tracks of data. This lowers the cost to store data. The downside is that when data is deleted, the newly freed space can be extremely slow to reuse. As such SMR drives are generally used for archiving duties where data is written sequentially to a drive with few, and preferably no, deletions. If this type of capability fits your application, you will find SMR hard drives to very inexpensive. For example, a Seagate 8TB Archive drive (model: ST8000AS0002) is $214.99, making the total cost for a 480TB Storage Pod 6.0 storage server only $16,364.07 or a very impressive $0.034 per GB. By the way, if you’re looking for off-site data archive storage, Backblaze B2 will store your data for just $0.005/GB/month.
Buying a Storage Pod
Backblaze does not sell Storage Pods or parts. If you are interested in buying a Storage Pod 6.0 storage server (without drives), you can check out the folks at Backuppods. They have partnered with Evolve Manufacturing to deliver Backblaze-inspired Storage Pods. Evolve Manufacturing is the contract manufacturer used by Backblaze to manufacture and assemble Storage Pod versions 4.5, 5.0 and now 6.0. Backuppods.com offers a fully assembled and tested Storage Pod 6.0 server (less drives) for $5,950.00 plus shipping, handling and tax. They also sell older Storage Pod versions. Please check out their website for the models and configurations they are currently offering.
Appendix A: Storage Pod 6.0 Parts List
Below is the list of parts you’ll need to build your own Storage Pod 6.0. The prices listed are “street” prices. You should be able to find these items online or from the manufacturer in quantities sufficient to build one Storage Pod. Good luck and happy building.
Item
Qty
Price
Total
Notes
4U Custom Chassis
Includes case, supports, trays, etc.
1
$995.00
$995.00
1
Power Supply
EVGA Supernova NEX750G
2
$119.90
$239.98
On/Off Switch & Cable
Primochill 120-G1-0750-XR (Chill-22)
1
$14.95
$14.95
Case Fan
FAN AXIAL 120X25MM VAPO 12VDC
3
$10.60
$31.80
Dampener Kits
Power Supply Vibration Dampener
2
$4.45
$8.90
Soft Fan Mount
AFM03B (2 tab ends)
12
$0.42
$4.99
Motherboard
Supermicro MBD-X9SRH-7TF-O (MicroATX)
1
$539.50
$539.50
CPU Fan
DYNATRON R13 1U Server CPU FAN
1
$45.71
$45.71
CPU
Intel XEON E5 -1620 V2 (Quad Core)
1
$343.94
$343.94
8GB RAM
PC3-12800 DDR3-1600MHz 240-Pin
4
$89.49
$357.96
Port Multiplier Backplanes
5 Port Backplane (Marvell 9715 chipset)
12
$45.68
$548.10
2, 1
SATA III Card
4-post PCIe Express (Marvell 9235 chipset)
3
$57.10
$171.30
2, 1
SATA III Cable
SATA cables RA-to-STR 1M locking
12
$3.33
$39.90
3, 1
Cable Harness – PSU1
24-pin – Backblaze to Pigtail
1
$33.00
$33.00
1
Cable Harness – PSU2
20-pin – Backblaze to Pigtail
1
$31.84
$31.84
1
Cable Pigtail
24-pin – EVGA NEX750G Connector
2
$16.43
$16.43
1
Screw: 6-32 X 1/4 Phillips PAN ZPS
12
$0.015
$1.83
4
Screw: 4-40 X 5/16 Phillips PAN ZPS ROHS
60
$0.015
$1.20
4
Screw: 6-32 X 1/4 Phillips 100D Flat ZPS
39
$0.20
$7.76
4
Screw: M3 X 5MM Long Phillips, HD
4
$0.95
$3.81
Standoff: M3 X 5MM Long Hex, SS
4
$0.69
$2.74
Foam strip for fan plate – 1/2″ x 17″ x 3/4″
1
$0.55
$0.55
Cable Tie, 8.3″ x 0.225″
4
$0.25
$1.00
Cable Tie, 4″ length
2
$0.03
$0.06
Plastic Drive Guides
120
$0.25
$30.00
1
Label,Serial-Model,Transducer, Blnk
30
$0.20
$6.00
Total
$3,494.67
NOTES:
  • May be able to be purchased from backuppods.com, price may vary.
  • Sunrich and CFI make the recommended backplanes and Sunrich and Syba make the recommended SATA Cards.
  • Nippon Labs makes the recommended SATA cables, but others may work.
  • Sold in packages of 100, used 100 package price for Extended Cost.